

The proper use of personal protective equipment is the fundamental line of defense in infection control, designed to break the chain of transmission for pathogens like bacteria and viruses. It is not merely a compliance requirement; it is a critical safety protocol that protects healthcare workers from exposure to infectious agents and prevents cross-contamination between patients.
Table of Contents
The Standard Order for Putting on PPE (Donning Sequence)
According to CDC guidelines, the standard order for putting on PPE is:
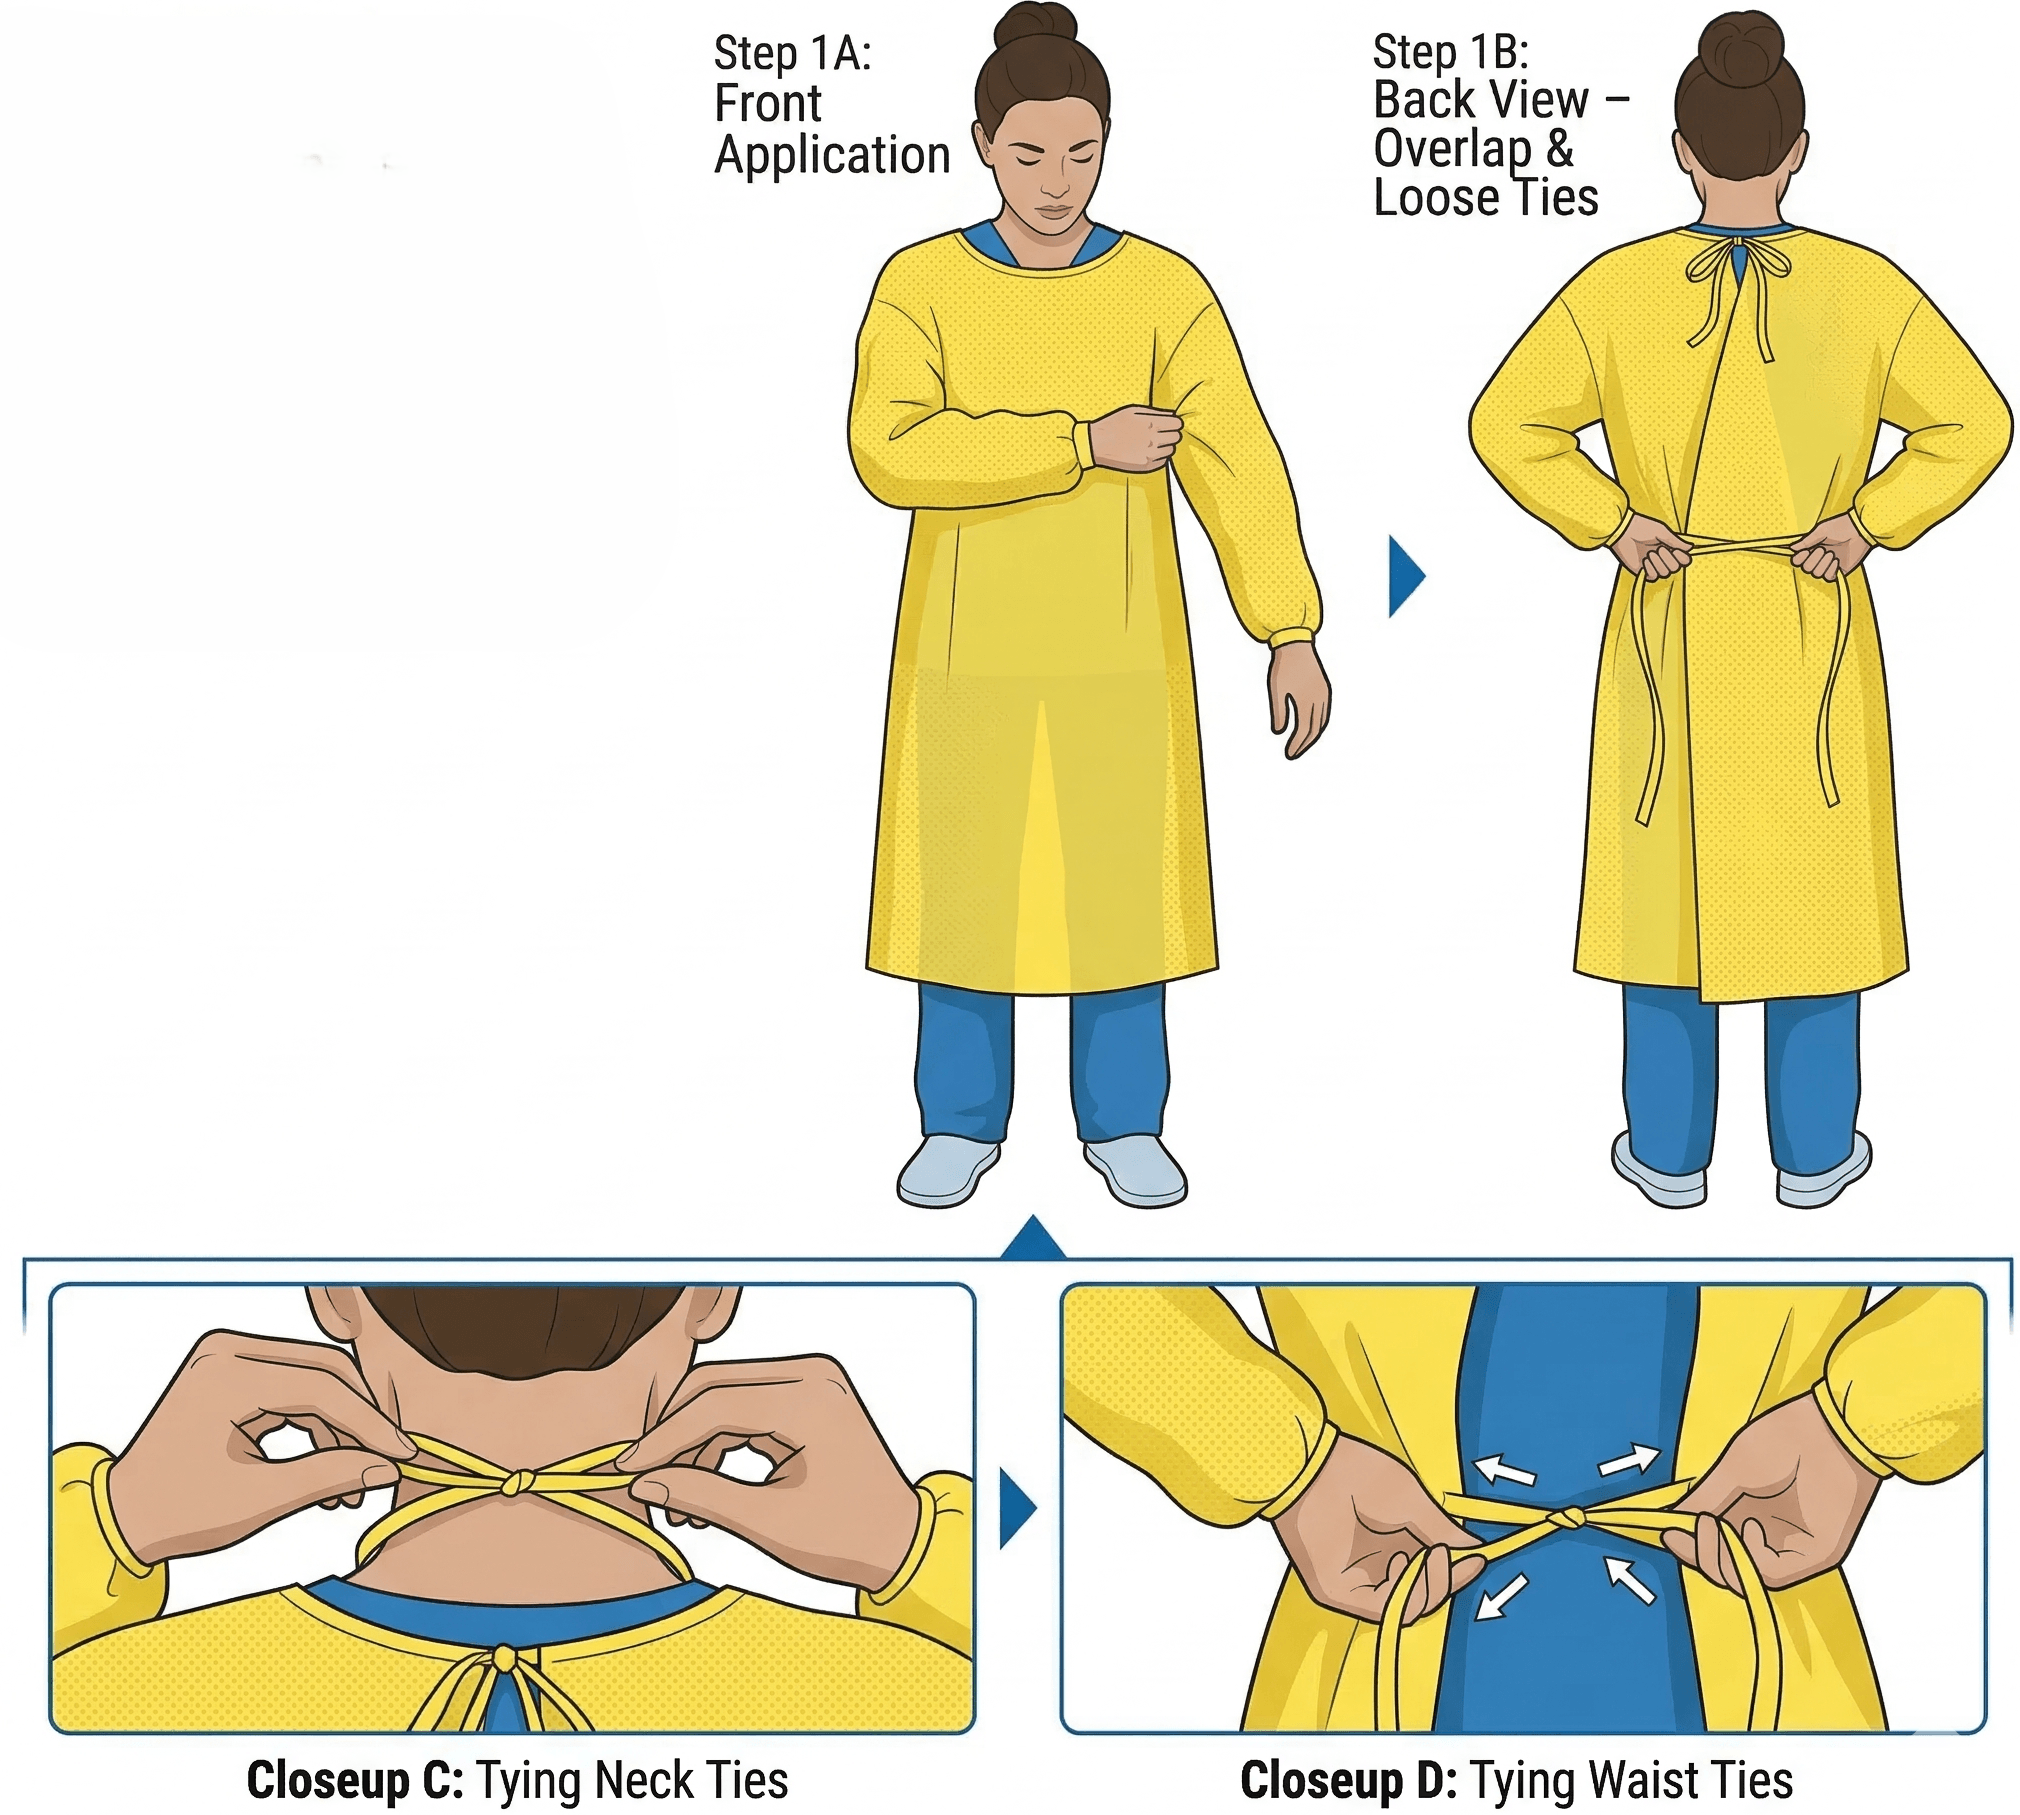
Step 1: Gowning – Securing the Torso and Arms
The gown fully covers the torso from the neck to the knees, with long sleeves extending to the wrists. It wraps around the back and is secured at the neck and waist. Gowning PPE correctly requires full coverage.
- Put on the gown with the opening in the back.
- Ensure the material fully covers your torso from neck to knees and your arms to the end of your wrists.
- Critical Detail: Fasten the ties at the back of the neck and the waist. Do not leave the waist tie loose, as a billowing gown increases the risk of snagging and contamination.
- If the gown is too small to wrap around your back fully, use two gowns (the first worn with the opening in the front, the second over it with the opening in the back).
- Hygiene Check: Ensure you do not touch the floor or other surfaces while securing the gown ties. If you do, perform hand hygiene again.
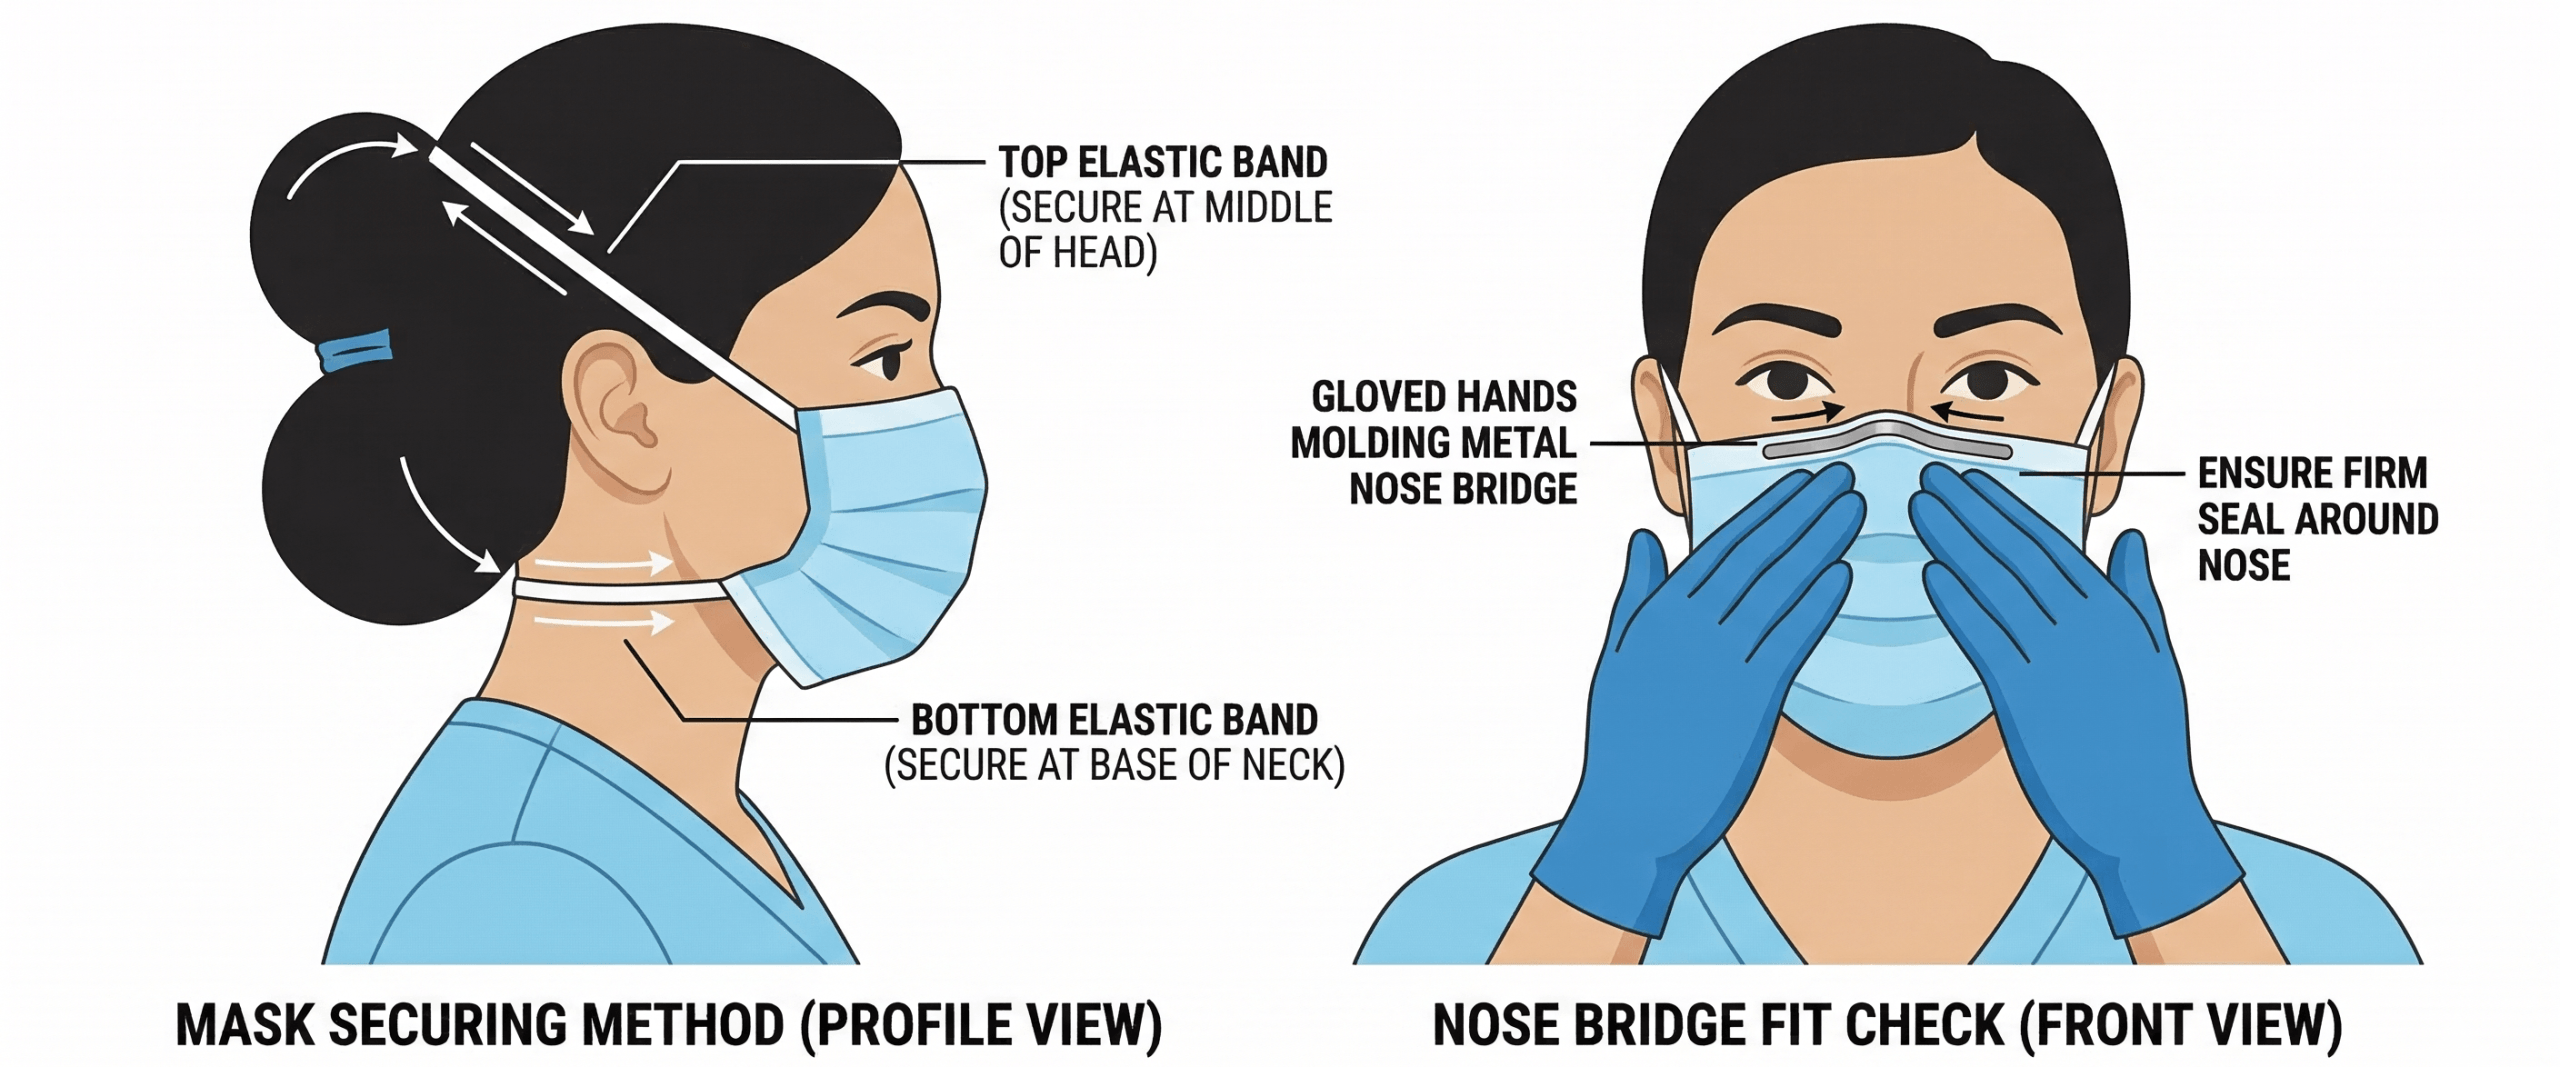
Step 2: Placing the Mask or Respirator
Ensure proper fit by securing the ties or elastic bands at the middle of the head and neck. Adjust the flexible nose bridge to conform comfortably to the nose. The respirator should fit snugly against the face, covering the nose and mouth, and extend below the chin. After positioning, perform a fit check to confirm an effective seal and proper fit.
- Secure the ties or elastic bands at the middle of your head and neck.
- Fit the flexible band to the bridge of your nose.
- Fit the mask snugly to your face and below your chin.
- Fit Check: If wearing an N95 respirator, you must perform a user seal check every time you put it on to ensure no air leaks around the edges.
- Hygiene Check: Once the mask is fitted, do not touch it again. If you need to readjust, sanitize your hands first.
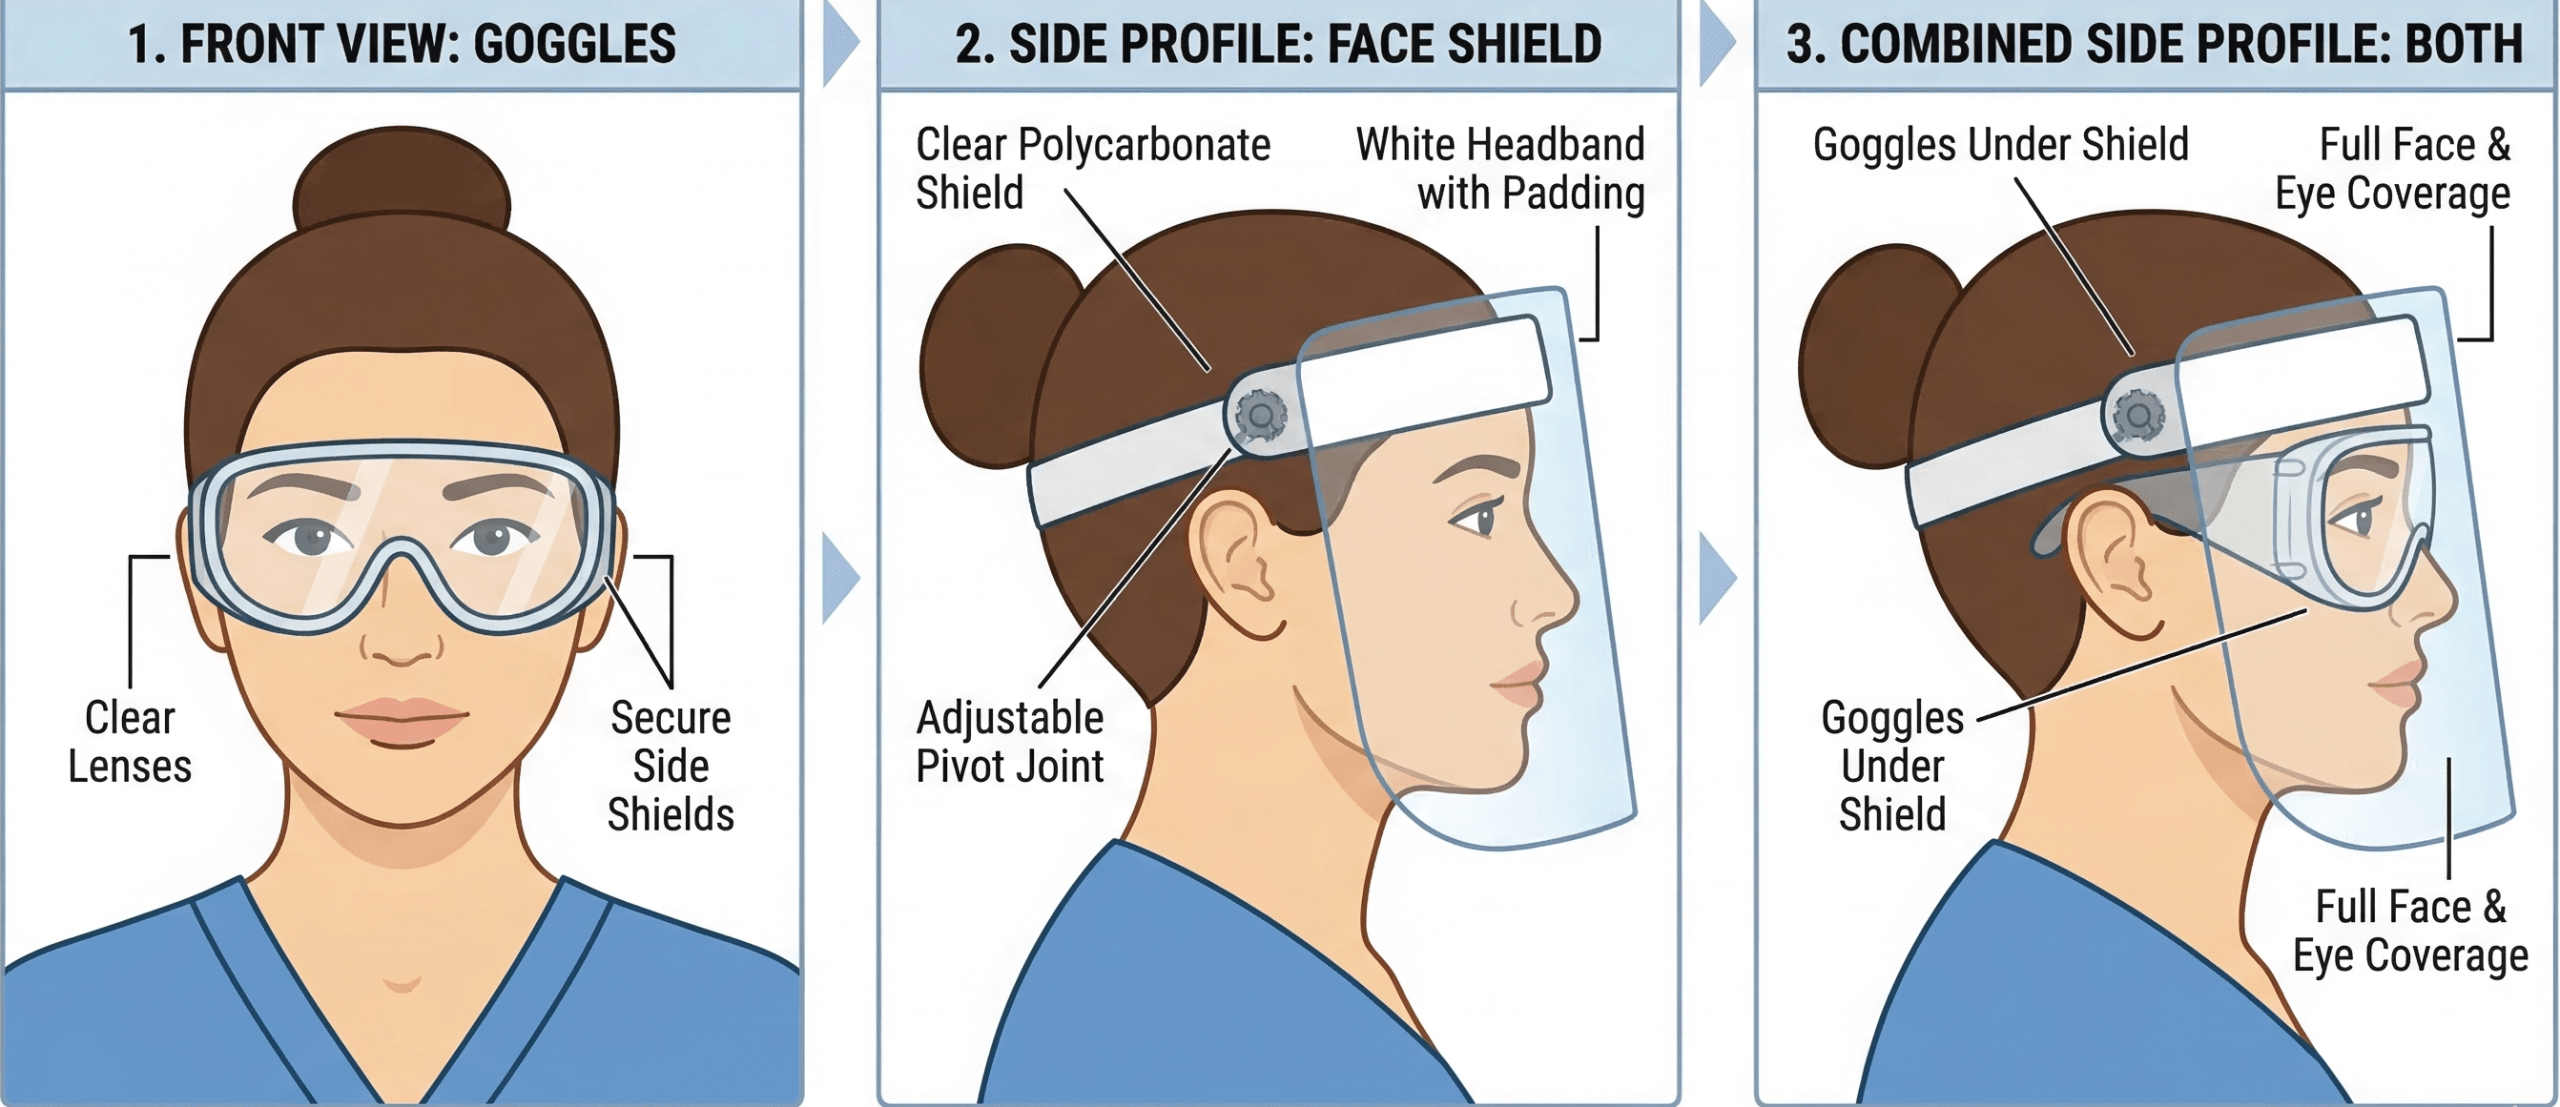
Step 3: Eye Protection (Goggles or Face Shields)
Position the goggles or face shield securely over your face and eyes, then adjust for a comfortable and proper fit.
- Place goggles or face shield over your face and eyes and adjust to fit.
- Personal prescription glasses are not considered adequate eye protection. The goggles or shield must sit securely over the mask, ensuring no gaps where splashes could enter.
- Hygiene Check: Avoid touching the front of the mask while placing the goggles.
Step 4: Gloving – Covering the Cuffs
Ensure that gloves extend fully to cover the wrist of the isolation gown, providing a secure and continuous barrier to maintain proper infection control.
- Extend your hands into the gloves.
- Crucial Safety Detail: Pull the cuffs of the gloves over the cuffs of the gown.
- There should be no exposed skin between the glove and the gown sleeve. This “shingling” effect ensures that fluids roll off the gown and onto the glove, rather than seeping onto your wrist.
- Hygiene Check: You are now fully protected. Do not touch your face or personal items (like phones) once gloves are on.

Following this specific sequence is scientifically designed to ensure that your most vulnerable areas (respiratory system and mucous membranes) are protected before you seal the barrier with gloves.
Memory Aid for Donning: Think “Bottom Up”. You start with the body (Gown), move up to the face (Mask/Goggles), and finish with the hands (Gloves) raised.
The Safe Procedure for Doffing PPE (Removal Sequence)
Doffing PPE—the process of removing protective gear—poses a higher risk for self-contamination than putting it on because the equipment is now considered “dirty.” The golden rule of doffing is to proceed with the mindset that the outside of all PPE is contaminated and must not touch your skin or clothing.
Memory Aid for Doffing: Think “Alphabetical Order”. Remove in this sequence: Gloves, Goggles, Gown, Mask. (Note: Some protocols combine gloves and gown removal, but the principle remains: protect the face until the end).
Critical Doffing Checkpoints (Don’t Do This):
- ❌ Never remove the mask before the gloves (this exposes your face to dirty hands).

- ❌ Never touch the front of the gown with bare hands.
- ❌ Never reuse disposable PPE once removed.

Step 1: Removing Gloves and Gown
Since the front of the gown and sleeves are contaminated, they are removed in one continuous step with the gloves.
- Gloves: Grasp the outside of one glove at the wrist. Peel it away from your body, turning it inside out. Hold the removed glove in your gloved hand. Slide a bare finger under the remaining glove at the wrist and peel it off over the first glove. Discard.
- Gown: Unfasten the gown ties (neck and waist), taking care that sleeves don’t contact your body when reaching for ties. Pull the gown away from your neck and shoulders, touching only the inside of the gown. Turn the gown inside out as you remove it. Fold or roll it into a bundle and discard.
- Hygiene Check: This is the moment of highest contamination risk. Assume your hands have microscopic contamination after this step.
Step 2: Hand Hygiene (First Round)
Perform hand hygiene immediately after removing gloves and gown. This is a critical checkpoint. If your hands were contaminated during the removal of the dirty gloves/gown, you do not want to touch your face to remove your mask. Do not skip this step.
Step 3: Removing Eye Protection and Mask
- Eye Protection: Remove goggles or face shield from the back by lifting head band or ear pieces. The front of the face shield is contaminated—do not touch it.
- Mask/Respirator: Grasp the bottom ties or elastics first, then the top ones. Remove without touching the front of the mask. Discard.
- Hygiene Check: With clean hands, remove these items carefully. If you accidentally touch the front of the shield or mask, stop and sanitize your hands immediately.
Step 4: Final Hand Hygiene
Wash your hands thoroughly with soap and water or use an alcohol-based hand sanitizer immediately after removing all PPE. This ensures no residual pathogens remain before you leave the procedure area.
Common Mistakes in Gowning and Doffing
| DO ✅ | DON’T ❌ |
|---|---|
| Do perform hand hygiene immediately after removing gloves. | Don’t touch the front of your mask or goggles. |
| Do ensure the gown covers your back completely. | Don’t leave the waist ties loose. |
| Do use a buddy system to check fit. | Don’t rush the doffing process. |
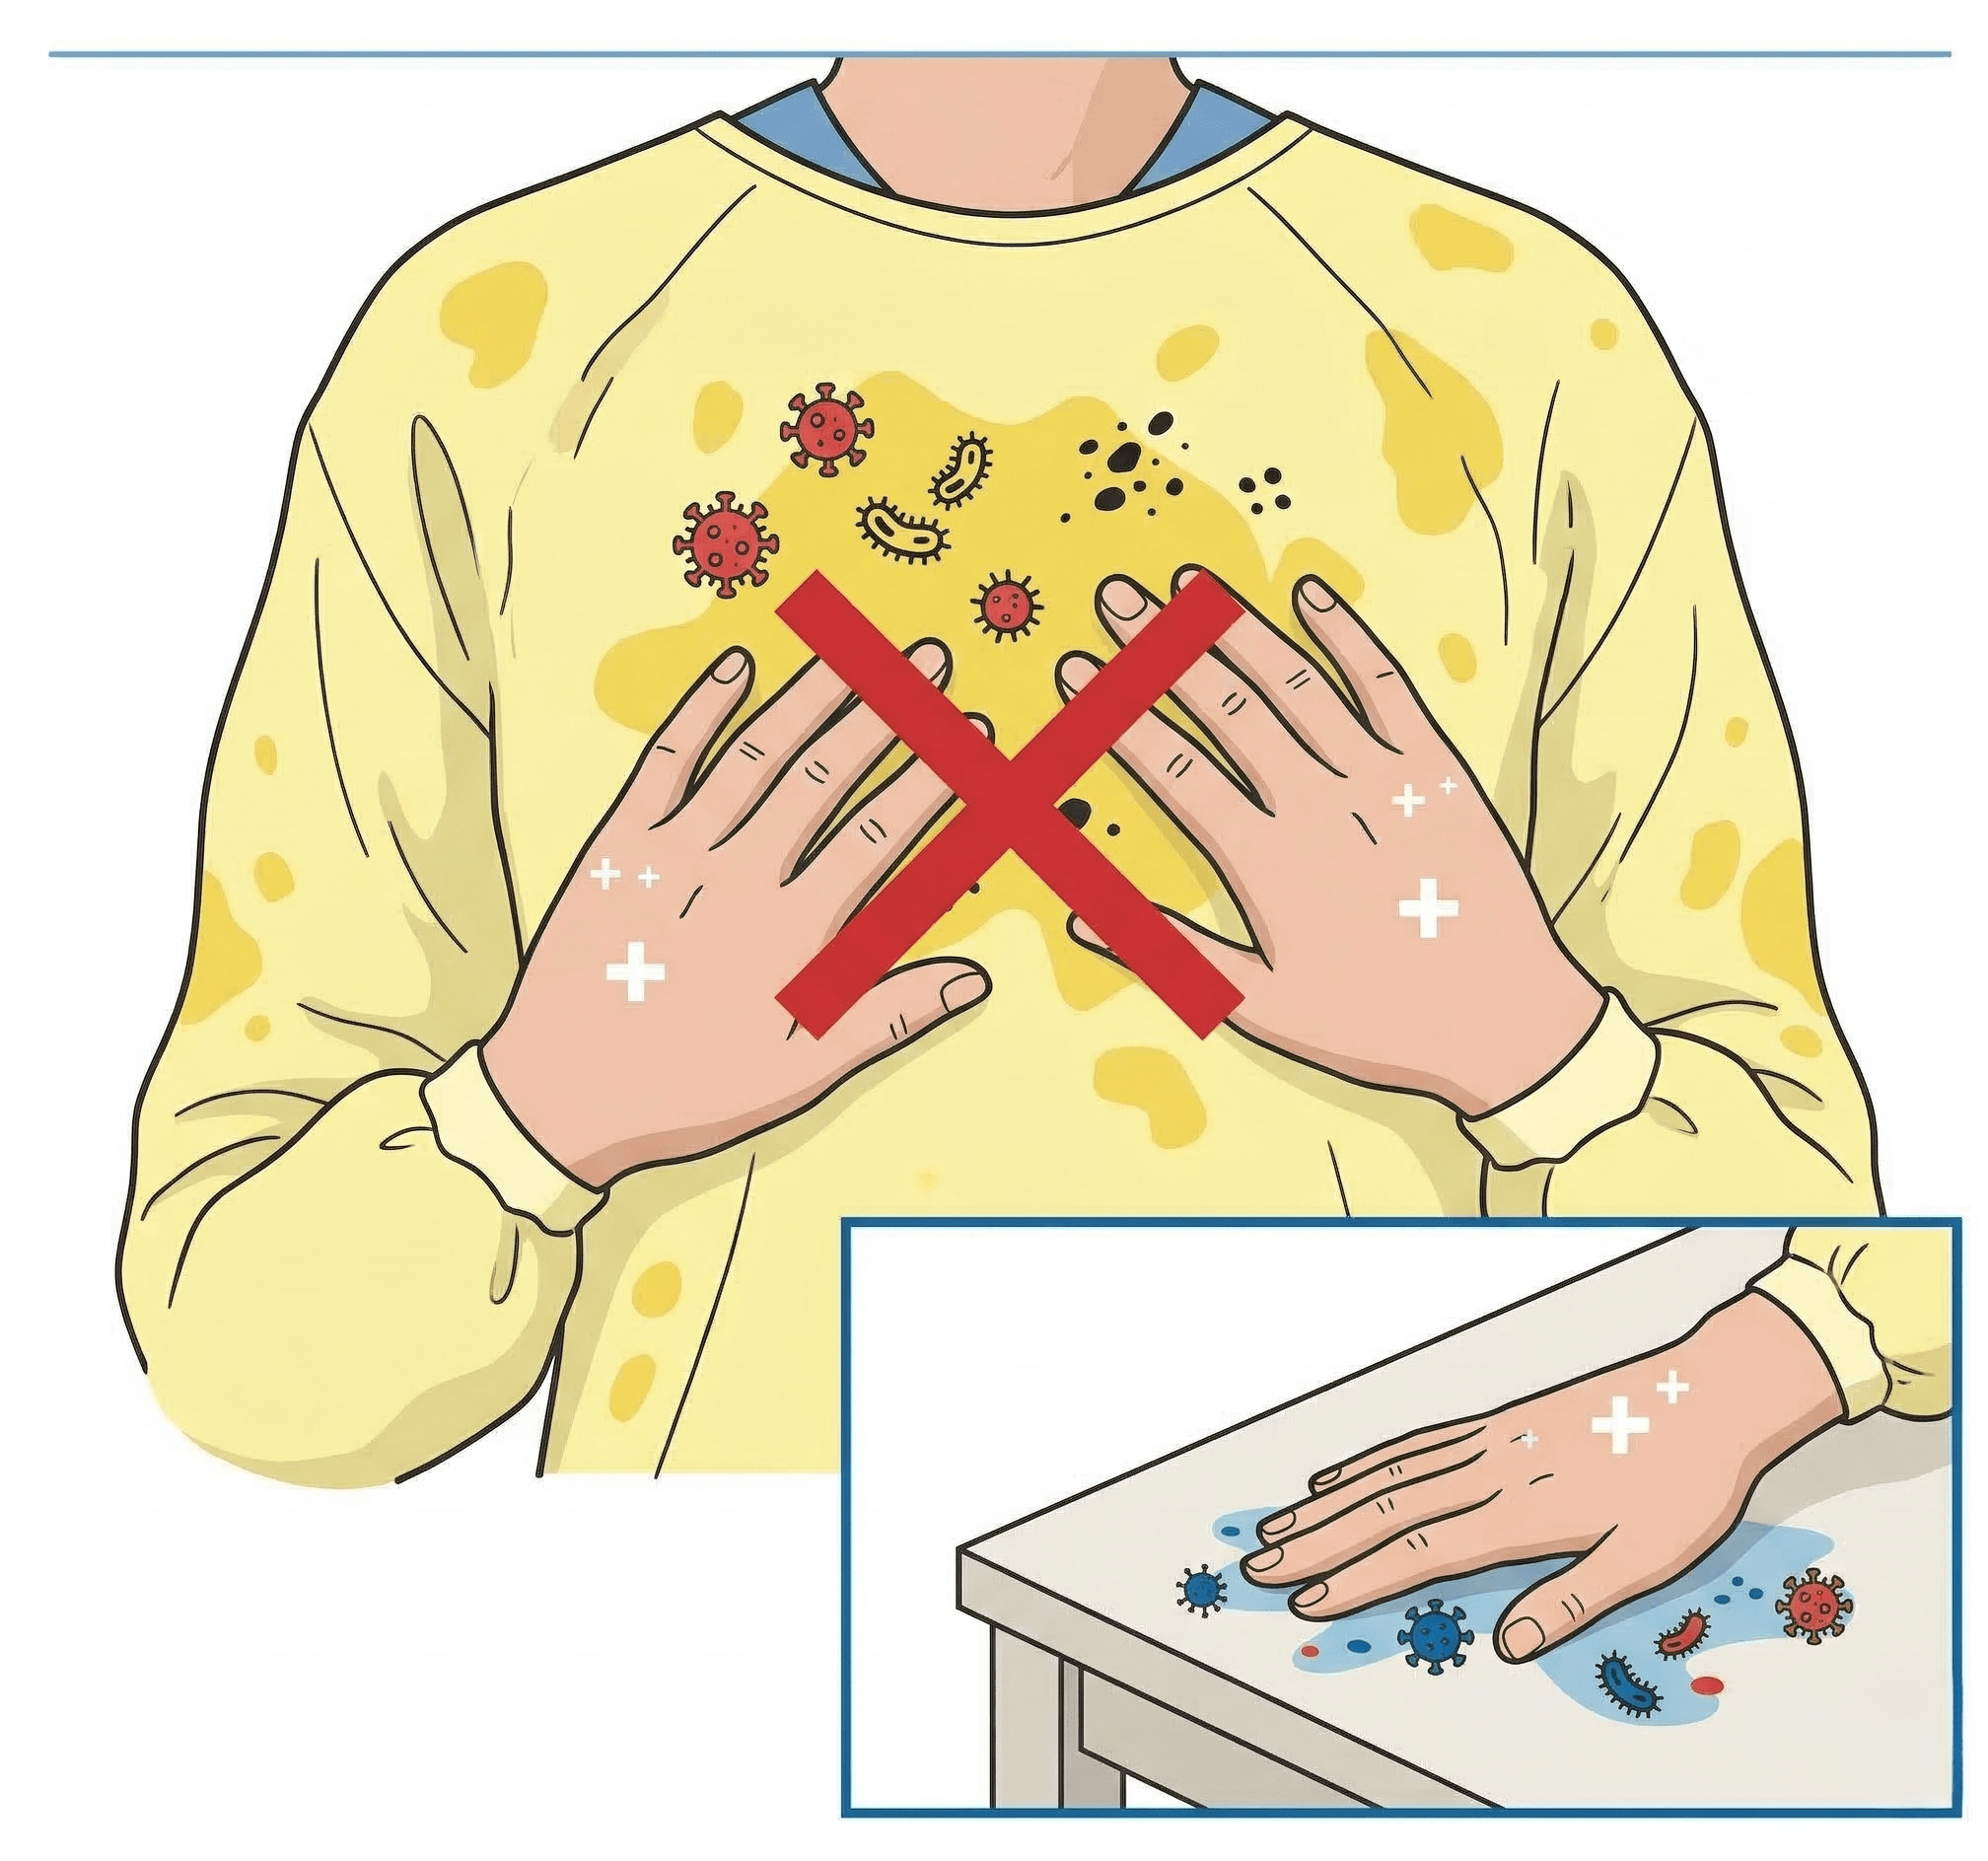
Frequent errors include failing to pull gloves over gown cuffs during gowning PPE, touching the front of the mask during doffing PPE, or rushing the removal process. These lapses break the sterile field and significantly increase the infection risk for the healthcare worker.
- The “Wrist Gap”: Failing to pull gloves over the gown cuffs leaves wrists exposed to fluids and pathogens.
- Touching the “Dirty” Zone: Adjusting the front of the mask or goggles while in a patient room contaminates the hands.
- Improper Doffing Order: Removing the mask before the gloves puts your face at immediate risk of contact with contaminated hands.
- Re-wearing Single-Use Items: Disposable gowns and gloves are designed for one-time use; material degradation compromises safety if reused.
Frequently Asked Questions (FAQ)
Q: Is the order for putting on PPE different for sterile procedures?
A: Yes, the process is completely different. For regular patient care, the standard donning ppe order focuses on protecting the healthcare worker from outside germs. However, during an operation, the strict rules of glove surgery procedures aim to protect the patient’s open wounds from any possible infection.
Q: What is the most critical step in doffing PPE?
A: The most critical aspect of doffing PPE is Hand Hygiene. It must be performed immediately after removing gloves (the most contaminated item) and again after removing the mask. If at any point during the removal process you suspect your hands have touched a contaminated surface, you must stop and sanitize your hands before proceeding to the next piece of equipment.
Q: Where should PPE be removed (Doffed)?
A: Generally, PPE should be removed at the doorway of the patient’s room or in an anteroom. However, the respirator (N95) should strictly be removed after leaving the patient’s room and closing the door to prevent inhaling airborne pathogens.
Q: What should I do if my PPE tears or gets heavily soiled during a procedure?
A: If a glove tears or a gown becomes heavily soiled/compromised, you must stop working immediately. Withdraw from the sterile field or patient area, perform the doffing procedure safely, perform hand hygiene, and don new PPE before resuming care.
Conclusion: Safety is a Sequence, Not Just a Product
Protecting healthcare workers goes beyond simply purchasing the right medical gowns or nitrile gloves. It requires a disciplined commitment to the correct order for putting on PPE and, even more critically, the safe procedure for removing it.
Whether you are managing a hospital’s PPE order or are a student learning gowning PPE for the first time, remember this: Contamination happens in the margins. It happens when a wrist is exposed, when a mask is touched, or when steps are rushed.
By following this step-by-step guide and adhering to strict hand hygiene protocols, you ensure that the barrier remains unbroken—protecting not just yourself, but every patient under your care.
References & Further Reading
- Centers for Disease Control and Prevention (CDC). Sequence for Personal Protective Equipment (PPE) Donning and Doffing. https://www.cdc.gov/hai/pdfs/ppe/ppe-sequence.pdf
- U.S. Food and Drug Administration (FDA). Medical Gowns and Protective Apparel Regulation. https://www.fda.gov/medical-devices/personal-protective-equipment-infection-control/medical-gowns
- Occupational Safety and Health Administration (OSHA). Personal Protective Equipment Standards for Healthcare. https://www.osha.gov/personal-protective-equipment
- National Institute for Occupational Safety and Health (NIOSH). Understanding the Difference: Surgical Masks vs. N95 Respirators. https://www.cdc.gov/niosh/npptl/pdfs/understanddifferenceinfographic-508.pdf
- ASTM International. ASTM F2100 – Standard Specification for Performance of Materials Used in Medical Face Masks. https://www.astm.org/f2100-23.html
Disclaimer: This guide is based on CDC and OSHA standards as of 2026. Protocols may vary by facility and specific infectious disease risks. Always consult your facility’s Infection Control Department for local guidelines.


